
This week, come on an adventure with us as we make the most perfect, velvety pom poms ever. Attach your new pompoms to our week end winter knit cowl in the new Noro Yarn, Kibou.
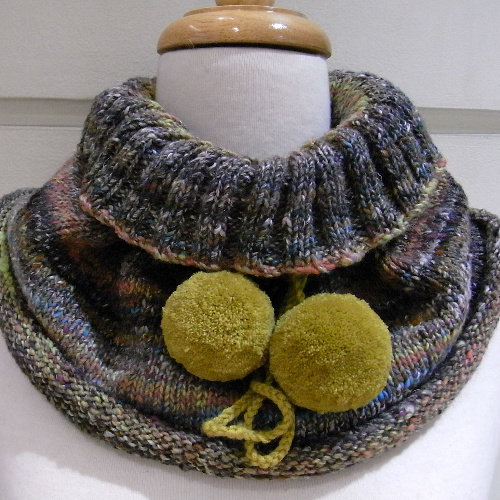
We are loving the new Noro Kibou yarn. A wool, cotton, silk mix. Sort of like Taiyo without the polyamide, and, of course, thinner. It knits up as an 8 ply. For those of you who are sensitive to wearing wool too close to the skin, this is certainly an alternative yarn. It has the most gorgeous tweed look about it when it is knit up. As a result you get the snugly, warm, wintery look without the scratch-itch factor. The world is indeed a lovely place when this happens!
The meterage goes on forever. Our cowl took only one ball. You could probably whip it up over the Easter week end (good alternative to overindulging in chocolate Easter eggs). This cowl is just the right size to pop into your handbag, to wear under a coat and, well, it has pompoms for some winter cheer! We know you’ll love it and want to make it, and we do aim to please, so, without much more ado, here is the pattern:
Materials: 1 x 100g Noro Kibou in Col 3 and a 60cm circular needle size 4.00mm.
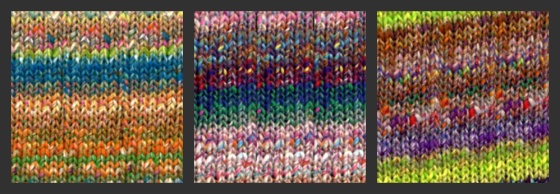
We used Col 3 because we thought it looked particularly tweedy. There are other colours available.
Top row from left to right: col 01, col 03, col 05.
Bottom row from left to right: col 08, col 09, col 11.

Cast on 162 sts and stocking stitch 20cm in the round. Change to a 3×3 rib and continue (about 10cm) until you have enough yarn to cast off and then cast off loosely.
Use the left over two ply yarn for the neck tie. Double it up a few times and make a cord. Thread the cord through the base of the 3x3rib and attach the pompoms, one at each end.
On to the pompoms…
There are pompoms and then there are these pompoms. First of all, throw away those cardboard circles and forks. They may make pompoms of some sort but they don’t make these pompoms. We are talking about soft velveteen pompoms that make you want to stroke them. According to those in the know this pompom maker from the Clover brand is the best thing since sliced bread. It is what we used to make the pompoms for our cowl. There are instructions on how to use the tool on the back of the packaging. Follow our tutorial to get the best results. You may not want to stop and will certainly find yourself in pompom heaven. We hope you enjoy the tutorial and find time to send us images of your pompoms and how you have used them.

What you will need:
Large Clover Pompom Maker as above. (We used the smaller one of the two).
1 x 50g/700m Morris and Sons Empire 2 ply.
1 skein of DMC stranded cotton in a colour to match your pompom yarn.
Sharp pair of scissors.
A saucer of water.

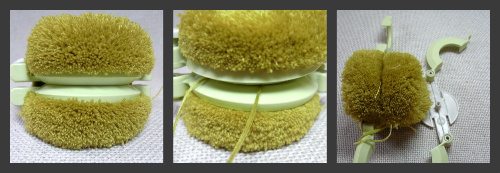
Flip open the two ‘hooks’ and using the 2 ply yarn start to wrap the first half of the pompom.

Keep wrapping until the ‘hooks’ are full. Make sure they are really fat and full and you have wrapped the yarn around evenly. Fold the hook back when you are done.

This entails quite a lot of wrapping. You may want to rest your arm and have a cup of tea before embarking on the second half.

Repeat for the other side. Your wrapped work should look like this. We had 15grams of yarn left after this.

Using a sharp pair of scissors cut the wound yarn along the outside. Hold the tool in your hand and make sure the hooks don’t flip open. When the yarn has been cut right round put the tool down.
Take the DMC stranded cotton, cut about a meter length off. Fold it in half and wet it in the saucer of water. Dab the excess water off. Slip the cotton between the discs and tie the pompom tightly. The wet cotton sticks when you tie down the knot and ensures that the tie off remains tight. Do not cut the threads of cotton. You’ll use these to tie the pompom onto the neck thread. Remove the hardware.
You will have a pompom that looks like a cross between and bedraggled mouse and a wrecked ball of yarn. That’s all ok and perfectly normal. Underneath all that hides the makings of the real thing.
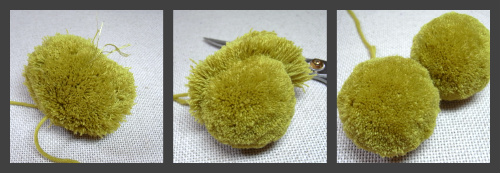
All it needs is a haircut. Not a trim, a haircut. Again take your scissors and begin to cut the pompom into shape. It’s perfectly ok to take off about 1cm.
Ba-da-bing, Ba-da-bang! The secret is out, 2 ply yarn and a decent haircut, that’s all it takes really.
Good luck and have fun!

